Using AWS ElastiCache Redis with Spinnaker
To productionalize a Spinnaker installation for high availability, one of the recommendations is to use an external Redis store, such as AWS ElasticCache. This guide will go over how to migrate a Kubernetes installation of Spinnaker to an AWS ElasticCache Redis instance using Halyard.
All config files (with the proper directory structure) used in this guide can be found in this this repo: ysawa0/spinnaker-elasticcache-redis
spinnaker logo elasticcache logo![]()
Create the ElastiCache instance

Keep Cluster Mode unchecked.
Node type will depend on your needs and budget, here we chose a m5.large
For Engine Version choose 3.2.10.
Configure Halyard and update Spinnaker
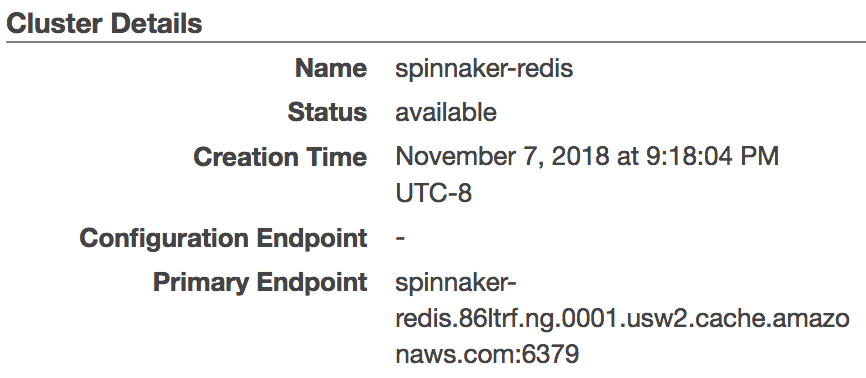
After the instance is created, copy the Primary Endpoint for the cluster.
If you want to update all Spinnaker services at once, place this snippet into ~/.hal/default/service-settings/redis.yml, and replace $REDIS_PRIMARY_ENDPOINT with your endpoint.
To update each Spinnaker service at a time, place the below into ~/.hal/default/profile-settings/$SERVICE-local.yml
Where $SERVICE would be orca, clouddriver, gate, etc.
Lastly, after updating the base URLs, place this into ~/.hal/default/profiles/gate-local.yml.
Now update Spinnaker by running hal deploy apply.
After you confirm that everything is working as expected, it’s time to disable the spin-redis service.
Update ~/.hal/default/service-settings/redis.yml by inserting enabled: false
And scale down the Redis Deployment to 0 replicas in Kubernetes.
Now sit back, relax and enjoy having to monitor one less data store.